Learning how to digitize for embroidery isn’t just about software or stitch types. It’s about knowing how embroidery works on real fabric. You need to think about the design, the material, the thread, and even how the final product will be used. It’s not easy at first. With practice and focus, you’ll see the difference between good and great digitizing.
This guide will walk you through some simple but important steps to help you get better. Good digitizing begins with the right technique. This applies whether you’re creating caps, bags, or custom embroidered patches.
Understand What Digitizing Really Means
Digitizing is turning a design—usually a logo or graphic—into stitches. That sounds simple. But doing it right? That’s where the challenge starts.
Every shape, line, and letter in your design has to be re-drawn with stitches. It’s not a copy-paste job. You’re choosing how every part is sewn. You pick the type of stitch. You choose the direction. You plan out the order. And you decide where to start and stop.
If the stitches are too short, the thread might snap. If they’re too long, the design could pull. If you use the wrong stitch type, the texture could look off. That’s why experts at embroidery digitizing services in the USA focus on each file. They understand it’s key to achieving a clean result.
Start With the Fabric in Mind
Before you even open your software, ask: What fabric is this going on?
Different fabrics need different setups.
- Thick canvas handles heavy stitching.
- Stretchy t-shirts need looser tension.
- Caps have curved surfaces that distort flat designs.
- Hoodies might need extra support.
Even 3D puff embroidery needs special rules. Puff uses foam under the thread, so your file needs space and bold outlines to keep the raised look clean. Digitizing without considering fabric first can lead to problems. The final result might fall apart or look different from your plan.
Use Size To Your Advantage
Size isn’t just about how big your design is. It affects every part of digitizing.
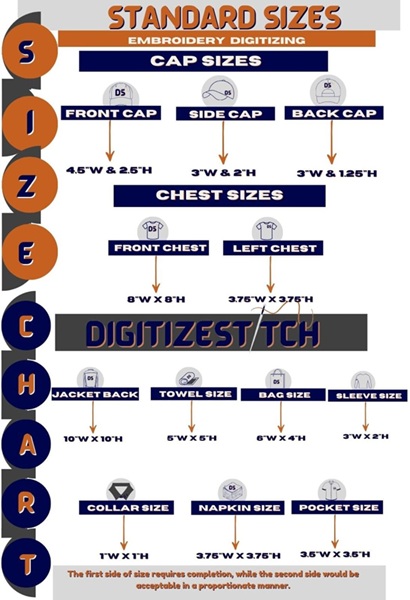
If your design is small, you’ll need to skip fine details. Letters might have to be thicker. Shapes might need adjusting. If it’s too large, you’ll need to control the stitch count to avoid puckering or dragging. A good embroidery size chart helps a lot here. It shows the best size ranges for placements. This includes sleeves, hats, chest logos, and back designs.
You don’t want to guess. If you’re working on custom embroidered patches, make sure you know the patch size first. That way, your digitizing fits inside without pushing too close to the edge or getting lost in the middle.
Learn The Key Stitch Types
There are a few basic stitch types used in almost every design. The trick is knowing when to use them.
- Satin stitch is perfect for letters and borders. It’s shiny and clean—but not great for large fills.
- Fill stitch works for bigger areas. It’s flat and smooth, but can look boring if overused.
- Running stitch is for outlining or detail work. It’s simple but very thin.
Choosing the wrong stitch can make parts of your design pop too much—or not enough. You also have to pick the right direction. The angle of the stitch changes how the thread catches the light. Even the smallest shift can make your design look more polished.
Test And Tweak Every Time
Here’s something a lot of beginners skip: test runs. Even if your file looks perfect on the screen, it might stitch differently in real life.
So always test.
Pick a fabric that matches your real product. Use the same stabilizer. Run the design. Then check:
- Are the letters clear?
- Are the edges smooth?
- Are the details too thick or too thin?
- Did the fabric bunch or pull?
Fix the small stuff now. Don’t wait until you’re stitching 100 pieces.
This is exactly what embroidery digitizing services USA do behind the scenes. They don’t assume—it’s test, check, improve.
Prepare Different Versions For Different Uses
A single logo might need many stitch files. One for a hoodie. Another for a cap. A smaller one for a sleeve. Maybe even a bold one for 3D puff embroidery. Trying to resize the same file across every item? That’s where problems happen. Letters can shrink too much. Edges start to blur. Patch borders might go out of place.
Instead, create different versions. Adjust the stitch density, angles, and size based on the use. It takes more time up front, but it saves you from headaches later. And if you’re sending your files to be stitched somewhere else, you know they’ll come out the way you expect.
Don’t Ignore Underlay
Underlay is the foundation. It’s the stitching you don’t see—but it holds everything together. There are different types: edge runs, zig-zag, fill. They each contribute in their own way: one keeps the fabric steady. Another stops the thread from sinking, and the last helps the top stitches stay flat.
If you skip underlay or use the wrong one, your design might shift or look uneven. It’s one of those small details that makes a big difference. Most people won’t notice it—but if it’s wrong, they’ll notice something is off.
Learn From The Work You Like
The best way to get better at digitizing? Look at real embroidery. Buy products. Zoom in on online photos. Study how patches are stitched. Pay attention to puff edges. Look at left chest logos and see how to digitize logo for embroidery.
Try to re-create those styles in your software. Try stitching them. See how they feel. You don’t need to copy—but you can learn what clean, professional embroidery looks like. And once you start seeing the patterns, it becomes easier to use them in your own designs.
Let Experience Guide Your Style
You won’t master every technique in a week. And that’s okay. Digitizing is one of those skills that grows over time. You’ll try things. You’ll fail a few times. You’ll learn what works and what doesn’t. But every project gets a little easier. And if you’re ever stuck? Services that digitize logos for embroidery help you compare your file to pro work.
You can even send your designs to embroidery digitizing services USA for review. Some will suggest improvements or offer editable files you can learn from. Over time, you’ll build your own style. And that’s when the real fun starts—because now, you’re not just following rules. You’re making embroidery that feels like you.